Sunday, March 27, 2011

Powder skin match??


CLICK PICTURE UNDER THIS IF YOU CHOOSE YOU SKIN TYPE


For a polished cosmetic look with professional results, you need to apply a powder to set the foundation make-up. But, choosing the right color of powder will make or break your image, so be sure to select the right one. As with a liquid or matte finished foundation, you will want to choose a powder that is lighter than your skin, however, too light of a powder may give you an eerie glow in the dark appearance.
For fair skinned women selecting powder, a clear translucent shade is your best bet to avoid a chalky white finish, and that's also the shade that is easiest to find in stores and one of the cheapest to buy.
For medium toned skin, try a honey or beige colored powder to lightly accentuateyour make up. The seam around the hairline and jaw should be blended well as to not leave a trace of powder on the face. Unblended color tones will appear to be 
For darken skin tones, try a warm honey beige or sandalwood shade that leaves your face with a clear, fresh finish. Powdered bronzers are another option to add a healthy glow to your skin. Lightly swipe your face with a large and wide cosmetic brush to highlight your forehead, cheek bones and chin for an all over even glow. And a  powered bronzer makes a great substitute for loose powder, especially in the summer time for that fresh as a daisy look.
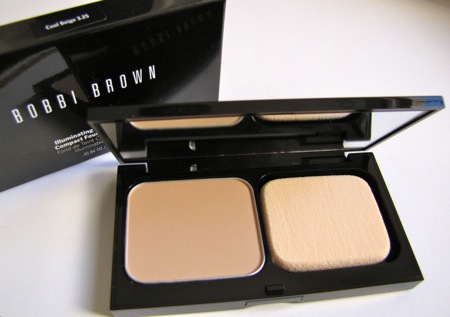
When choosing the color of your powder, also regard the texture of the powder, as pressed powder in a compact does not spread as thinly and evenly as loose powder. The compact type powder should be used for touch ups throughout the day, rather than your finishing touch on fresh make up.
Some of the best loose powder brands come from Coty and Revlon that give a generous portion for a moderate price. Most women use their loose powder only once a day, so a large container may last you for over a year. Just be sure to change your applicator sponge or puff regularly to reduce contamination with bacteria. You may also wash your applicators, but they are cheap and plentiful to buy in a package of five from most beauty supply outlets.
However, a compact powder container is not as durable as the loose powder. Because the product is compacted into a tight space, the application of the powder is a bit stiff and sticky. The compact works best for light pats where necessary over your upper lip and cheek bones. In addition, the compact powder applicator is subject to a day's worth of sweat and grime, so be sure to replace the puff at the first sign of soiling.

smokey eyes

THIS IS THE VIDEO HOW TO APPLY AND MAKE SMOKEY EYES TO GET PRETTY EYES LIKE CELEBRITIES


smokey eyes

Once you have chosen your feature eye shadow color you need to choose your supporting eye shadow color. If you prefer to use single eye shadows, rather than a color coordinated duo or triple eye shadow, choose a light color eye shadow that matches your feature eye shadow color. Possible colors to choose from, for a soft sophisticated look, are: lilac, light peach, champagne, taupe, nude or a sand color. For a more dramatic high contrast look you could use a whitish color eye shadow.
Smokey eye makeup tip: Use powdery eye shadows. Do not use creamy texture eye shadows as they are more difficult to smudge and blend.
Smokey Eye Makeup Guide Step 2: Choose your eyeliner pencil.
Choose a soft eyeliner pencil of the same color or a complementary shade to your feature eye shadow.
Smokey eye makeup tip: If possible choose a Powderliner eyeliner pencil. They are easier to blend and are sometimes available with a sponge tip for easy blending.
Smokey eye makeup tip: Never use liquid eyeliner. Liquid eyeliners are better for sharper lines, not a soft and sultry finish.
Smokey Eye Makeup Guide Step 3: Apply your foundation base.
Normally you would apply your full foundation before applying your eye makeup. This is not the case when doing smokey eye makeup. You should apply your eye makeup first, that way if you get some of your eye shadow on the rest of your face you won’t ruin your foundation. This also helps avoid a raccoon eye look under your eye. For smoother eye shadow application, that lasts longer, you do however want to first apply a thin layer of foundation to your eyelids followed by a thin layer of face powder to set the foundation. This will give you a clean canvas for your eye shadow and will also help to prevent the eye shadow from creasing. This will also give you more even, accurate, eye shadow application.
Smokey Eye Makeup Guide Step 4: Apply your eyeliner.

Line both the top and bottom rims of your eyes with your eyeliner pencil.
Typically you would use a black or charcoal eyeliner pencil but you can also use a dark eyeliner pencil that matches your feature eye shadow color.
Make sure to go into the eyelash line itself (near the root of your eyelashes). Be sure to fill in any bare spaces between the eyelashes.

Smokey Eye Makeup Apply your eyeliner


Start from the inner corner of your eyes with a fine line.
As you go outwards towards the corner of your eye make the line heavier.
If you have any hard lines from using a heavy eyeliner pencil you will want to lightly smudge the line so it is softer and less harsh looking.

Smokey Eye Makeup - Apply your eyeliner 1
This step is made a lot easier by using a Powderliner eyeliner pencil with a built in sponge tip for smudging.
Smokey Eye Makeup - Apply your eyeliner 3
Smokey eye makeup tip: Dark colors tend to make small eyes look even smaller. You can open your eyes up by applying eyeliner starting from the middle of the bottom eyelash line, rather than the inside corner, and going to the outer corner of the eye. If your eyes are not smallish feel free to apply the eyeliner from corner to corner.
Smokey Eye Makeup Guide Step 5: Apply your eye shadows

Using your larger eye shadow brush apply your supporting eye shadow color to your eyelids, up to the base of your eyebrows.
Now, using your feature eye shadow color, and your small eye shadow brush, apply your dark feature eye shadow onto the eyeliner and then blend it upward to the crease of your eyelid.

Smokey Eye Makeup - Apply your eye shadows

When blending your feature eye shadow keep as much of the color intensity as possible along the eyelash line and particularly in the outer corners of your eyes.
Smokey eye makeup tip: Remember smudge and blend so the eyeliner and eye shadows go together seamlessly.
Smokey Eye Makeup Guide Step 6: Apply your mascara

Smokey eye makeup tip: Curl your eyelashes before applying mascara, this opens your eyes up.
Apply 2 or 3 coats of black mascara applying the mascara in thin coats to avoid clumping.

Smokey Eye Makeup - Apply your mascara


Smokey Eye Makeup Guide Step 7: Complete your smokey eye makeup look

Complete your foundation being careful not to mess up your beautiful smokey eyes.

Keeping your lips neutral gives smokey eyes their real impact. Use a flesh toned lip pencil and a pink or caramel shade of lipstick or lip gloss to give your lips a subtle finish.
For your eyebrows you can use your normal eyebrow pencil. You could also use a shade darker than normal to complement your smokey eyes.

Apply a subtle finish of rose or tawny blusher just to the apples of your cheeks blending away to the edges into your hairline. This finishes the face without competing with your smoldering smokey eyes.

Sexy smokey eye makeup


Enjoy your sexy, smoldering smokey eye makeup look!

Donna is a trained makeup artist with her own beauty business. As both a business woman and a mom with 2 children Donna understands the time pressures on women today and through this, and other articles, has endeavored to take the complexity out of looking great with some "busy women friendly" beauty tips and advice.

Why and how to use loose face powder.


While different people's looks often demand varied types of makeup, some cosmetic elements are classic and can be used by everyone regardless of their age, skin type or fashion. Whatever your style, loose face powder is a critical thing to have in your bag of makeup tricks.
SETTING YOUR MAKEUP
For people who wear foundation, loose powder can be used to set the foundation, making it last longer. In addition to adding longevity, the powder adds a nice matte finish to the face.If you have normal or dry skin, apply a light dusting of loose face powder as soon as you have put on your foundation. Use a large, fluffy powder brush with natural bristles to lightly spread a thin layer of the powder. Brush away any visible deposits of excess powder. If you have oily skin and wear foundation, try applying a very light dusting of loose powder on your clean face before you apply your foundation. Then, apply foundation and top with another layer of powder. Using the powder in this way will help absorb extra oil and keep your makeup looking fresh throughout the day. Even women with normal skin may find this technique helpful during hot and humid weather. Use your brush to lightly blend your powder down onto your neck and shoulders if you are wearing a strapless top; this keeps your skin tone looking consistent and makes your exposed skin all more polished in appearance.


 THIS IS SOME VIDEO HOW TO APLLY LOOSE POWDER

POWDER??


Powder is an effective beauty aid to make the skin look even, soft and attractive.
Powder is the last item of your face make-up. It is available in two forms-cake and powder.
While choosing a powder, keep in mind your complexion and choose a shade that goes with it. If the complexion of your facial skin and the shade of powder differ, the skin will look blotchy.
Do not use cake powder on oily skin, because it contains an oil-base. While using powder, be sure your locks of hair are not dangling on your face.
Apply powder with a clean, cotton puff and discard the used one.
Powder should be dabbed on the face slowly, dexterously with a steady hand, applying light pressure, so that it settles down in the pores. Dust off extra powder with a powder brush or a cotton wool pad.
If the powder is not well-set, the face looks blotchy. Powder gets stuck on eyebrows and eye-lashes, if not cleaned with an eyebrow brush. Brush extra powder off with an anti-clockwise movement, from the end of the eyebrow upwards.


this is video how to apply powder

APPLY STICK FOUNDATION

Stick foundations are very easy to apply and very comfortable. Stick foundations are cream-to-powder foundations that come in stick form. With the coverage of a liquid and the precision of a concealer the foundation stick is appropriate for normal to oily skin types, but i dont recommend it for those women or man with sensitive and dry skin. The best advantage of the stick foundation is that it can be also used as a concealer when applied over to problem areas and imperfections. Stick foundations provide full coverage and a matte finish, hide blemishes, scars, discolorations and brown spots. Most of these foundations contain sunscreens and moisturizing ingredients. A stick foundation glides on effortlessly and stays on for 7 /8 hours. The stick system provides precise application and even touch-ups.

HOW TO APPLY STICK FOUNDATION
1 Step Cleanse and tone your face
Always 
apply foundation to a cleansed and toned skin. Use a mild cleanser appropriate for your skin and cleanse your face thoroughly to remove all the impurities and oils that have accumulated during the night. Tone your skin with a toner that suits your skin.
2 Step Moisturize your skin 
Always moisturize your skin before applying the foundation even if your skin is oily. The first step when applying makeup is the application of appropriate moisturizer according to your skin type. It will improve your skin quality and act as a protective layer to help trap the moisture in the skin and stop it from evaporation.
3 Step Apply the stick foundation 
Roll up the tube and make sure the tip appears slightly above the container level. You can stroke the top of the stick with your fingers or apply the stick directly to your face. Roll the stick foundation over your face – foreheads, cheeks, nose and chin and blend carefully. Pay attention to areas where foundation tends to collect. Dont forget to apply foundation to the neck, especially if you are using darker shade of foundation otherwise your face will look like a mask and unnatural. Make sure everything blends together and looks the same. Blend out to your hair and jaw line until the foundation vanishes. There should be no hard lines or patches.
THIS I GIVE YOU SEE THE VIDEO HOW TO APPLY STICK FOUNDATION

B.B. Cream?


B.B. Cream is short for Blemish Balm Cream and is a product which provides a light-weight coverage with many combining properties such as skin whitening, anti-wrinkle and a bunch of other goodies. Being unsure where it's originated from, it's actually quite popular in South-East Asia and in fact, only Asian companies manufacture these BB Cream (excluding Maybelline from Singapore, of course).

There are many many many brands out there, such as Skin79, Dr. Jart and a thousand others. The only international company I know which makes BB Cream is Maybelline, but the product itself is NOT distributed internationally. Only in Singapore or Malaysia, I believe. Correct me if I'm wrong but I DO know that for sure, there IS a Maybelline BB Cream.

Anyways, a few years ago, I've tried out 2p Blemish Base SPF35 PA++


I don't have it anymore because I've passed it to a bestie who found it to
 work on her really well :) since it didn't work out for me..


I bought it after watching Bubzbeauty's review and after a long time of using. I'm unsure how long, but surely more than a month.

At that time, I still had my acne, and I don't remember if it broke me out or anything as my skin was always breaking out. So applying it, I don't know whether it got worse or not.

1. BB Cream for all skin types
This BB cream corrects skin tone splendidly and provides nutrition and sun cream effect in one go in the busy morning. Presents soft application, wet moisturizing feeling, and refreshing long-lasting effect for all day long, (same feeling as when first applied) and is great for all skin types.
2. Splendid Skin Expression, whenever and wherever
It corrects dullness and expresses any skin tone into splendid, vital baby skin. With its strong water-proof effect, it can be used for exercises like yoga & work-outs during which you want minimal coverage.
3. Charmed by Lovely Covering Power!
Perfect coverage covers up pigments, liver spots and fine lines even when thinly applied, giving you self-confidence.
4. UV Blocking effect (SPF35 PA++)
Prevents skin cell damage from ultraviolet rays and cuts off sunburn from skin outside, by blocking UVA and UVB at once.
5. Trouble Prevention & Skin Protection
CSTM and Phyto-oligo ingredients prevent trouble, and Shea Butter and Ceramide ingredients form moisture loss protection membrane from moisture loss to keep skin moisturized.


My skin conditions at the time: My skin was very oily a few years back. It wasn't until I went on Roaccutane that my skin started to dry up and now my skin conditions has definitely went for a whopping 360 degrees change.

When applied: I'm unsure if I have got darker or light over the years or anything, but right now, I am between NC40 & NW42. I'm a neutral. I'm a little bit of both warm and cool tones. When applied on me, it didn't cover very much of my acne or anything. I definitely didn't see any whitening at all, but it didn't make me tan easily either. It was just neutral. The coverage was definitely very very sheer. And when applied, it had a grey cast over my face, no matter where I applied it.
I'm REALLY unsure about the oxidized finish. Besides that, it made my skin look very shiny and at the time, it was Autumn, but some days were very hot.

However, for my friend! I saw her apply it yesterday with her fingers and realised that it looks VERY nice on her. It matched her skin very nicely with no greyish cast. And I don't notice anything about the oxidized shade after a few hours. She doesn't need to much coverage at all so the BB cream suited her VERY well! :) And she also said she liked it very much and the shade really matched her skin tone too! I'm really unsure about her MAC shade though since she doesn't use foundation :P

So that's the experience we both had. It differs for our skin conditions and our needs. So yes.
Unlike my friend, I seek for a heavier coverage so the product wasn't for me. I prefer tinted moisturizers over the Missha BB Cream really. I haven't tried other BB creams yet so I can't tell you.

But this was my experience with oily and acne-prone skin with DR.YOUNG  in shade #23. I think there's a shade #31 now if anyone wants to give it a try :P